🌵 azWoodman.com 🌵
Arizona Specialty Woodcrafts

❈ Tutorial: Knockdown (KD) Bookcase~ by author Simon WattsA bookcase is an essential item of furniture, and one that virtually anyone with a little know-how can build. Since they're expensive to buy and awkward to move, here's an economical knockdown version that you can tailor to suit your needs. Planed, dimensioned lumber is widely available, and some stores will even cut it to length, so you can complete this project without a table saw. |
|
 In fact, once you have lumber that's cut to the size you want, you'll need just a handful of tools. An electric drill is handy; so are a low-angle block plane and a combination square with a built-in level. To curve the top and bottom of the side supports as we did with our hanging bookcase, use a coping saw, a band saw or a portable jigsaw with a fine blade. In fact, once you have lumber that's cut to the size you want, you'll need just a handful of tools. An electric drill is handy; so are a low-angle block plane and a combination square with a built-in level. To curve the top and bottom of the side supports as we did with our hanging bookcase, use a coping saw, a band saw or a portable jigsaw with a fine blade.
Before you invest in tools and lumber, decide on the size and placement of the new bookcase. Do you want it standing on the floor or hung on the wall? How many books do you want to accommodate? As a rough guide, figure that 15 average-size books take up 1 foot of shelf. Keep in mind that paperback books weigh about 7½ lbs per linear foot, hardcover books 13 lbs, magazines 26 lbs and reference works as much as 34 lbs per linear foot. If your books are on the light side, a ¾" softwood shelf will span 27" without sagging. For weightier times - dictionaries and the like - reduce the span to 15". For an average collection of books, a safe span would be 24". Increase these dimensions by about a quarter if you're using hardwood - Oak, Maple and the like - since it's stiffer than softwood. Even hardcover books are seldom more than 7" wide, so it's safe to use 1" x 8" stock for the shelves. (Remember that the stock is actually ¾" x 7½" after being cut, smoothed and dried.) For the sides, use 1" x 10" (actually ¾" x 9½"). Select boards that aren't twisted or cupped and that are reasonably straight. You'll get the best buys on locally available softwoods such as pine, spruce, Douglas fir and any of the cedars. You can also get a sheet of ¾" veneered plywood and have it cut (or cut it yourself, if you own a table saw). If you take this route, cover the raw edges of the plywood with molding or ¾" x ¼" wood strips. |
 It's a great convenience to be able to adjust the middle shelves according to the height of books. Shelf standards, the slotted metal tracks that mount to a wall and hold clips to support shelves, are readily available and come in assorted colors. If you can't get the exact length you want, shorten them with a hacksaw. It's a great convenience to be able to adjust the middle shelves according to the height of books. Shelf standards, the slotted metal tracks that mount to a wall and hold clips to support shelves, are readily available and come in assorted colors. If you can't get the exact length you want, shorten them with a hacksaw.
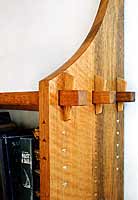
A handsome alternative is making your own wooden shelf standards: rip strips of ⅜" x ¾" hardwood, and drill 5/16" holes on 1" centers for 5/16" diameter dowel pins. You can mount them onto the surface of the bookcase, or dado them in with a router. Unlike the middle shelves, the top and bottom shelves aren't adjustable. One way to connect shelf and side is with a through-mortise and wedged tenon, as shown. This takes some woodworking experience and is best executed in hardwood. An easier, quicker alternative is to use flat-head, slotted 5/16" machine screws that engage with nuts that are permanently fixed into the shelves, as the detail drawing shows. |
| 📌 PLEASE NOTE: Some people simply run drywall screws through the side supports into the ends of each shelf. I don't recommend this, because screws have little holding power when driven into the end of a board and will eventually lose their grip - perhaps disastrously. You don't want the machine screws alone to carry the weight of the books, though. Before you start drilling, decide where you'd like to place the top and bottom shelves, and install 1-by-3-inch (¾" x 2½") ledger strips underneath them on each side. Because these ledger strips will support the shelves' weight, screw the ledgers rather than nailing them. Then use the ledger strips to position the shelves as you drill the holes for the machine screws. |
| Next, drill the mounting holes in the sides and in each end of the top and bottom shelves. Start with the top shelf. Hold it firmly against one of the sides, positioned on the ledger as shown. Then, mark the side for three 5/16" diameter holes that will pass through the side and into the end of the shelf. Place one hole in the center of the shelf and the other two 1" in from each edge. Drill 2½" into the end of the shelf.
Finally, mark and drill three 1" diameter holes through the board's face to make clearance openings for the nuts and washers. Place the centers of these holes 2" in from the end of the board and in line with the 5/16" holes. Bolt shelf and side together with the machine screws, washers and captive nuts. Having these fixed together is like having a third hand as you mark and drill the other end of the shelf. Bolt this together, too, and then move on to the bottom shelf. With all shelves bolted in place, use automotive Bondo® or an epoxy wood filler to fill the 1" diameter holes in the shelves. This locks the nuts in place - "captures" them - so you can take the bookcase apart and reassemble it when necessary. Sand the top and bottom surfaces smooth when the filler is hard. It's a good plan to mark each joint with a letter or number because it's unlikely they'll be interchangeable. Attach the shelf standards with the screws they come with, about 2 inches in from the edge. I like to make small notches in the ends of each shelf to fit the metal standards. These notches prevent the shelves from sliding in or out. If you're using wood strips instead of standards, attach them with 1-inch #8 brass screws about 6" on center.  After the Loma Prieta earthquake in 1989, I checked my vacationing neighbor's apartment to find his floor-to-ceiling bookcases, full of LPs and art books, toppled to the floor - and no sign of the cat. (She finally emerged from the motor compartment of the refrigerator, where she had sensibly taken refuge.) I advise fastening your new bookcase to the wall with L-shaped metal brackets. Even if you live in the Granite State, this is a worthwhile safety precaution. After the Loma Prieta earthquake in 1989, I checked my vacationing neighbor's apartment to find his floor-to-ceiling bookcases, full of LPs and art books, toppled to the floor - and no sign of the cat. (She finally emerged from the motor compartment of the refrigerator, where she had sensibly taken refuge.) I advise fastening your new bookcase to the wall with L-shaped metal brackets. Even if you live in the Granite State, this is a worthwhile safety precaution.
If you've built the hanging bookcase, mount it to the wall with a 1" x 3" softwood ledger strip cut to fit between the bookcase's sides. Before you mount the ledger, drive some brads into its top edge, at a slight angle. Nip the heads off so that only about ½" projects, as shown in the drawing. Now fasten the ledger strip into the studs with drywall screws, checking it with a level. Set the bookcase in place from above, bearing down until the nails bite into the underside of the top shelf. Depending on the weight of your books, you may want to add a second ledger strip to support the bottom shelf. |
❈ About the Author:

 Simon Watts has been designing and building contemporary furniture since 1962. He has written extensively on woodworking and tools.
His book, Building a Houseful of Furniture was published by Bell & Hyman in 1984. You will read about 43 plans and instructions for building beds, chests, bureaus, tables, chairs, sofas, desks, library steps, and bookcases.
NOTE: Although no longer in print, this hardcopy version is available and advertised as "used" on Amazon.com. →
❈ Ready-made Foldable Bookcases:
No time to build your own? Here are some ready to buy ... in association with Amazon.com.


📌 We are a participant in the Amazon.com Services LLC Associates Program, an affiliate advertising program designed to provide a means for sites to earn advertising fees by advertising and linking to Amazon.com.