 ❈ How to Build a Toy Box
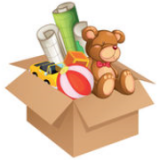
Kids hate to pick up their toys. But if you give them this good-looking box to put their playthings in, the battle is half won.
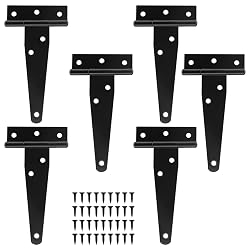
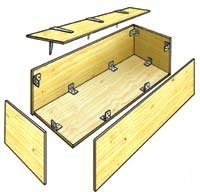
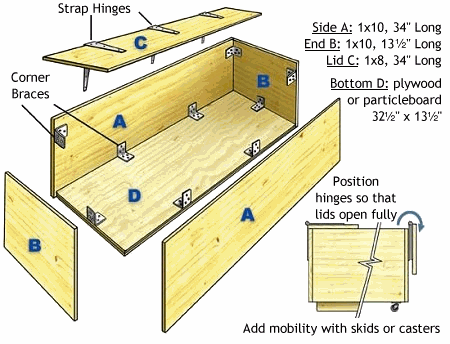
Held together by corner braces and strap hinges, this is a simple project that involves no joinery or complex woodworking.
🛠 Building a Toy Box:
... a step-by-step tutorial by author
Simon Watts
You'll make most of the box from 1 x 8 and 1 x 10 boards of pine, fir or other dressed softwood, and its bottom from ¾" plywood or particleboard. Check that the boards you buy are reasonably flat and free of large, loose knots. Construction is extra-simple: you just cut the boards to length and assemble them with brackets and hinges.
Click on
this drawing. Print it out to use as a reference.
1. Cut out all pieces:
With tape measure, square and a handsaw or circular saw, cut one side and one end from each of two 4 ft 1 x 10s. Cut the lids from a single, 6 ft 1 x 8. Cut the bottom out yourself, or have the lumber yard cut it for you.
2. Assemble the pieces:
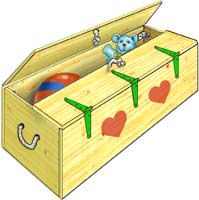
Note the overlaps shown in the drawing: the sides and lids (marked A and C in the enlarged illustration) overlap the ends (B), and the bottom fits inside. Working on a flat surface, screw six corner braces in place on the box bottom, flush with the edges as shown. Next, screw the ends to their braces, then the sides to theirs. Now add the four upper corner braces that attach the sides and ends to each other.
Finally, lay the lids in place flush with the ends and sides, and screw the strap hinges in place, orienting them as shown in the drawing. The lids must swing through a ¾ circle, so they come down flat against the sides, to give your child full access to the box.
3. Disassemble and apply finish:
Now take the box apart for finishing. With the hardware off, sand everything smooth. Spray-paint the hinges and corner braces a cheerful solid color, and spray a clear polyurethane finish on the wood, inside and out. (If you don't, the box will soon begin to look grubby.)
If you want to decorate the sides and lid (with stencils, for example) do it
before you apply the polyurethane. Choose a satin finish for the wood, and you can apply several coats for durability and still avoid that "plastic" look.
4. Final assembly and finishing touches:
When the finish is dry, reassemble the box. For extra strength, add wood glue to the joints.
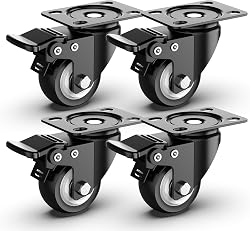
To make moving the box easier when it's full of toys, add swivel casters at the corners. Solid-wood runners glued and screwed to the bottom will also work - but you'll want to add furniture glides if your kids will drag the box over a hardwood floor.
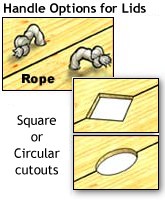
A pair of rope handles is a great convenience for picking up or moving the box: just drill two ½" or ⅝" diameter holes in each end, and thread heavy, soft rope through from the outside, tying overhand knots on the inside.
You can use a similar detail to make rope handles for the lids. Or make the "handles" as cutouts in the lids, as shown in the illustration. If you take this route, make the cutouts when you first cut out the lids. Make the straight cutouts with a handsaw and the circular cuts with a jigsaw.
 About the Author
: Simon Watts has been designing and building contemporary furniture since 1962. He has written extensively on woodworking and tools. His book,
Building a Houseful of Furniture was published by Taunton Press in 1984.