
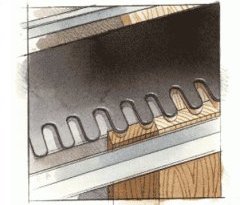
Step 1. Dovetail jigs come with a template or "comb," with a series of "fingers" that you guide a router along to cut the dovetails.
 A standard ½" template works in conjunction with a ½" dovetail bit, and typically has fingers spaced ⅞" apart as shown at left. However, we've seen some templates with 1" spacing. And, manufacturers offer optional templates with smaller finger spacing. For example, with our Porter-Cable jig we occasionally use a ¼" template that has fingers spaced 7⁄16" apart. Measure the spacing and make note of it. A standard ½" template works in conjunction with a ½" dovetail bit, and typically has fingers spaced ⅞" apart as shown at left. However, we've seen some templates with 1" spacing. And, manufacturers offer optional templates with smaller finger spacing. For example, with our Porter-Cable jig we occasionally use a ¼" template that has fingers spaced 7⁄16" apart. Measure the spacing and make note of it. |
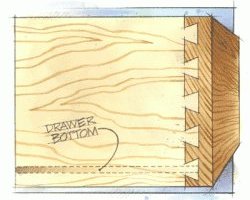 Step 2. Make the width of your workpieces an increment of the finger spacing. For example, a template with ⅞", 4 ⅜", or 5 ¼" - wide pieces. Step 2. Make the width of your workpieces an increment of the finger spacing. For example, a template with ⅞", 4 ⅜", or 5 ¼" - wide pieces.
That way, your workpiece will have equal half dovetails at the top and bottom of the joint as shown. |
 Step 3. Most likely, your dovetail jig will have a set of stops on both ends that the edges of the workpieces butt against. Step 3. Most likely, your dovetail jig will have a set of stops on both ends that the edges of the workpieces butt against.
Set these according to which template you are using as shown. |
Step 4. Now, select your stock and plane or resaw it if necessary. Drawers typically have ½" thick fronts and ½" thick sides and backs.
 Using a Porter-Cable jig, the ½" template requires workpieces at least ½" thick. The ¼" template works with drawer fronts at least ⅜" thick, and sides at least 5/16" thick. Using a Porter-Cable jig, the ½" template requires workpieces at least ½" thick. The ¼" template works with drawer fronts at least ⅜" thick, and sides at least 5/16" thick.
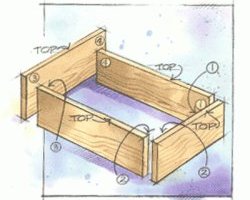
Cut your workpieces to size, making sure they are square, and arrange them as shown. Mark the top edges and number all of the matching inside corners. |
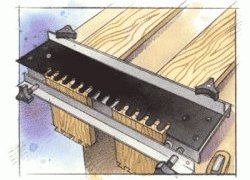
Step 5. Grab two workpieces with same-numbered corners. Place them into the jig with the numbered ends together, the drawer side positioned vertically, and the front or back sitting horizontally as shown.
 The inside (numbered) surface of the drawer parts should be facing away from the jig, visible to you. The workpieces should be in contact with the stops, and tight against each other, with the face grain of the horizontal workpiece flush with the end grain of the vertical piece. To speed things up, place workpieces on both ends of the jig as shown. This only works if the width of your pieces is less than half of the jig's capacity. The inside (numbered) surface of the drawer parts should be facing away from the jig, visible to you. The workpieces should be in contact with the stops, and tight against each other, with the face grain of the horizontal workpiece flush with the end grain of the vertical piece. To speed things up, place workpieces on both ends of the jig as shown. This only works if the width of your pieces is less than half of the jig's capacity. |
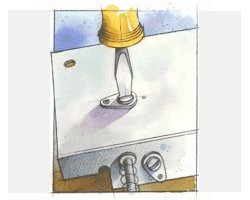
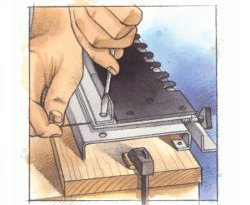
 Step 6. Mount the correct guide bushing into your router's base. Our jig requires a bushing with a 7⁄16" outside diameter (O.D.) when using a ½" template, and 5/13" O.D. bushing for its ¼" template. Step 6. Mount the correct guide bushing into your router's base. Our jig requires a bushing with a 7⁄16" outside diameter (O.D.) when using a ½" template, and 5/13" O.D. bushing for its ¼" template.
Secure the necessary dovetail bit, and use a metal rule to adjust its height according to the instruction manual as shown. |
| Note: Perform the following steps in scrap stock that's of the same dimensions as your workpieces. After you're satisfied with the results, cut your actual workpieces as described in Step 7. |
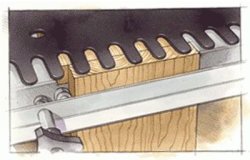
Step 7. Working from left to right, move the router in and out of each of the template fingers. Go slowly, especially near the ends of the cut, to ensure clean results.
 Remove the two workpieces and check their fit with one another. The dovetailed ends should slide together with firm hand pressure or light tapping with a rubber mallet. If the joint requires more force than that, or won't go together at all, decrease the height of the bit and repeat your test cuts. If the dovetails fit together too sloppily, increase the bit height. Remove the two workpieces and check their fit with one another. The dovetailed ends should slide together with firm hand pressure or light tapping with a rubber mallet. If the joint requires more force than that, or won't go together at all, decrease the height of the bit and repeat your test cuts. If the dovetails fit together too sloppily, increase the bit height. |
 Step 8. If you run into grain splintering near the end of the cut, add a scrap piece as shown. Step 8. If you run into grain splintering near the end of the cut, add a scrap piece as shown.
The scrap may splinter, but it will help keep the workpiece clean if the two are tightly butted together. |
Step 9. Now, check if the dovetails go together so that the face grain of the drawer sides aligns flush with the end grain of the front or back.
 If they won't align flush, you need to increase the length of the dovetail cuts by adjusting the templates in, away from the router. If they won't align flush, you need to increase the length of the dovetail cuts by adjusting the templates in, away from the router.
If the dovetail cuts are too long and the workpieces go more than a hair past flush, adjust the templates out, toward the router. With our Porter-Cable jig, we do this by loosening a holding screw and micro-adjusting a setscrew in or out with a hex key as shown. |
|
▸ Content © WOOD Magazine (WOODstore.net) ▸ Authors: Bill Krier with Chuck Hedlund ▸ Illustrations: Brian Jensen |

This joinery video from Marc Adams illustrates the basic ways of joining wood, selecting a joint, and what joints to use. The joints covered in this video include dovetails cut by hand, half-blind dovetails, how to cut and lay out drawers, as well as making sliding dovetails on a router table. It also includes hand-cutting and machine-cutting mortise-and-tenon joints, compound miters, and hip joints.