ARTICLES BOOKS FREE PLANS FURNITURE LUMBER POWER TOOLS SHOP SAFETY
Arizona Specialty Woodcrafts
your woodworking resource on the web
Google Search    the Web azWoodman.com
arrow How to: Build a Fence arrow How to: Build a Dog House arrow How to: Wood Stripping arrow How to: Build an Arbor
ASW = Arizona Specialty Woodcrafts
Click Here: Current Sales, Closeouts and Promotions at Rockler.com
Free Woodworking Catalog
Box Building:
» Box Hardware
» Box Lumber Data
» Box Making Supplies
» Custom Box Plans
» Free Plans
» Humidor Supplies
» Inlay Bandings
» Lumber for Boxes
» Music Box Kits
» Our Custom Boxes
» Power Tools
» Shark Pro CNC
» Splined Miter Joints
» Writing Slope
Reference Books
Decks by Tim Snyder
Decks by Tim Snyder
Complete Deck Book by Sunset Books
Building a Deck (Build Like A Pro) by Scott Schuttner
How to Design & Build Decks & Patios by Ortho Books
How to Design and Build Decks by Mark R. Bremer
Outdoor Plans:
Outdoor Plans
DIY & How-Tos:
» Baby Cradle Plans
» Build a Dog House
» Build a Murphy Bed
» Build a Toy Box
» CNC Wood Carving
» DIY Bed Plans
» DIY Project Plans
» Gun Cabinet Plans
» Wood Stripping
» Wood Craft Kits
» Woodworking Lathes
Wood Branding:
Personalized Custom Branding Irons
Mission Plans:
WOOD™ store
Wood Craft Kits
Arts & Crafts Style
  Woodcraft Catalog
  Rockler Catalog

Designing a Deck

by Tim Snyder ~ Content © CornerHardware.com
Deck with jacuzziDecks allow you to live outdoors and yet be above it all: no need to worry about wet grass, muddy shoes or finding a level place to put your chair. They're great for entertaining and relaxing, they solve site problems and they greatly enhance the resale value of your home—right behind kitchen and bathroom remodels.

Best of all, you can build one in a few weekends and you don't need a lot of specialized equipment. You can get by with a good-quality circular saw, a framing hammer, a carpenter's square, an electric drill, a plumb bob, a 25- or 30-foot tape measure, a 4-foot level and a line level. With this gear, you can build a pro-quality deck.

No matter what scale your deck, design consists of six stages. The first one is to figure out what kind of deck you want to build.
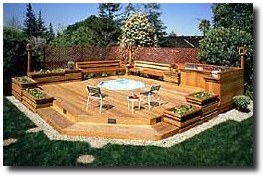
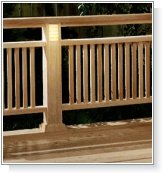
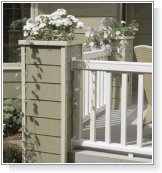
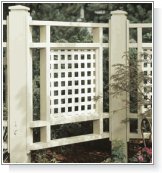
» Collect Ideas

If you haven't done so already, start collecting pictures of decks with features you like: built-in benches, planters, distinctive railings, dining and barbecue areas, trellis designs and so on. Your local library can be a good source for deck design books; you'll also find up-to-date articles in home improvement magazines, especially in spring and summer issues. And don't forget to activate your deck "radar" when you're out driving around.

Once you start looking for decks, you'll be surprised at how many you find. Meanwhile, to give you an overview of the more common types, here's a portfolio of designs.

Concrete Patio

» Grade-level Decks

As the before-and-after photos show, a redwood deck can be the best thing that ever happened to a cracked, aging concrete patio. It's also a great makeover for a poured concrete pool surround.

If the concrete is basically sound, your decking boards can go down over sleepers— 2-by lumber laid facedown on 16-inch or 24-inch centers.

Grade-level DeckMost grade-level decks are actually a step above grade (ground level). This allows the deck to drain easily and resist rot. If you don't have a concrete patio to deck over, a simple foundation of posts or concrete pads can provide support. Grade-level decks are the easiest decks to build.

One important design detail to remember, especially for grade-level decks with doors opening onto them: make sure the deck is lower than the door. Putting a deck at doorsill level invites snow and rain accumulations to leak into the house. If you must have the deck and doorsill at the same level (for wheelchair access, for example), consider sheltering this intersection with an awning or a small roof.

Elevated deck

» Elevated Decks

Because elevated decks sit well above the ground, many local building codes require railings around them. Since railings will be the most visible part of any elevated deck, consider them carefully. If you live in snow country, avoid railings with balusters fastened to the joists that run around the deck's rim. This makes it very difficult to sweep snow off the deck. Choose a railing with balusters that end at a bottom rail, so there's an open area for snow removal. Built-in benches like this one complement the overall design, and, as shown here, help to separate different deck levels.

The post-and-beam framework that supports the joists for an elevated deck is not just a structural consideration. It will be visible, so it needs to be as handsome as possible. Closely spaced 4-by-4 posts look good in some situations; in others, you may want to go with larger beams supported by 6-by-6 posts spaced farther apart. Placing the posts at the outer edge of the deck can look clunky. Instead, you might want to position a post-and-beam supporting structure several feet inside the deck's perimeter and cantilever the joists.

An elevated deck may need a stairway. If yours does, you'll find it can be a challenge to work one into your design. A straight stairway is easiest to build, but not always suitable. A landed stairway takes up less room. Building inspectors tend to be sensitive about stairways, so make sure to comply with local code requirements that specify minimum stairway width, railing measurements and tread sizes.

Multilevel deck

» Multilevel Decks

Building a series of connected deck levels can eliminate the need for stairways. The rocky site with a difficult slope pictured here called for a multilevel deck. Built-in benches take the place of railings, while broad steps create a cascade effect. An alternative is to build separate decks and connect them with stairways. Either way, a multilevel deck can be the best way to deal with a sloping site that doesn't provide much usable lawn space. Such decks are the most challenging and costly to design and build, but they're generally worth the effort.

Decks for above-ground pools

» Decks for Aboveground Pools

Aboveground pools demand a deck that follows the curve of the pool wall. This design provides sunbathing space and a well-concealed under-deck area for filter equipment and associated gear. Don't attempt to extend a deck all the way around the pool. Instead, build against one section only, and expand the deck space away from the pool edge. Design an area beneath the deck for filtration equipment and other gear, and consider screening this area with solid wood or exterior plywood siding. (Don't forget to add an access door.) You can unify the design by staining the decking and the under-deck panels to match.
Deck with jacuzzi

» Decks with Hot Tubs or Spas

These decks differ from poolside decks in several ways. First, they need beefier framing to support the weight of the spa or hot tub. If the circulation and heating components aren't contained within the unit, you'll have to make room for these elements in the deck design. The spa is the center of attention in this redwood deck, but the design includes built-in benches, planters, cabinetry, light fixtures and a privacy screen.

Freestanding deck

» Freestanding Decks

Who needs a house? A deck can go just about anywhere.

It could be a simple sunbathing platform or an outdoor "room" embellished with built-in benches and a trellis.

» Go Back to Square One

The area where you plan to put your deck will influence your final decisions about the project, so you'll want to start by drawing that space and showing its dimensions. You'll need some graph paper, a pencil and a 25' or 30' tape measure. You'll need to make two kinds of sketches: plan views, showing the area from above, and elevations, or side views.

If you're building your deck against the house, measure the wall and then draw plan and elevation views of it just the way it is. Note window and door locations and electrical outlets. Graph paper makes it easy to draw things roughly to scale; one square can equal a foot or some fraction of a foot. Work to the largest scale possible.

Use your tape measure to figure the location of anything in your yard that may need to be moved, removed or incorporated into your deck: trees, shrubs, rock outcroppings and so on. Show their locations on your drawings.

Don't start drawing your deck yet. These "as-built" plan and elevation drawings show everything but the deck. When they're finished, make at least a dozen photocopies. Go back to your idea file, retrieve the good stuff, and start sketching your deck—on the photocopies. You can also work on tracing paper laid over the master drawings, at least at first. At this stage, try out all kinds of designs—paper is a lot cheaper than lumber.

» Draw Plans and Elevations of Your Deck

Once you've compiled an interesting collection of ideas, wrestled your way through the major design questions, and arrived at a fairly solid idea of the deck you're going to build, it'll be time to make serious drawings to scale.

Deck plansMake plan and elevation drawings of what your deck will look like when it's finished. An overall plan of your project will include the area covered by decking boards, stair treads, and railings. If you'll be putting tables, chairs, planters, barbecues or other items on your deck, you can use your plan to figure out where each one should go. Draw the items to scale, and then cut them out and move them around on the plan.

On the elevations, show joists, posts, beams, rails and balusters, plus house facades that abut your deck. Make sure your drawings include doors, windows, light fixtures, and the like—both existing and planned. As you get all these details down on paper, you may need to alter your design here and there. Now's the time.

When you're ready, draw the final dimensions of your deck. You don't have to do this by hand, though. Generating drawings can be easy with computer software; you can modify and print out scale drawings in an hour or two. Some lumber dealers will do this for you, charging a nominal fee ($25 or so) that gets applied to your lumber order.

With your plans in hand, you can figure out the amount of any given material you'll need, and the cost. The materials you select will make or break your budget.

» Select Your Decking

The top of the deck—the decking—will be the most visible part of it and will take the most abuse, thanks to foot traffic and weather. If you have any extra money in your budget, spend it on better-quality decking.

Decide which way you want your decking boards to run. If you go with more expensive decking, minimize waste by using long boards that are cut close to their standard lengths. Your lumber dealer can provide you with information about standard lengths for different decking materials.

» Tip from the Pros

In general, build with longer lengths of wood; the fewer board-ends, the better. Though it's possible to create interesting patterns with short boards that join at different angles, butting boards together over a joist traps water, invites decay and encourages splitting.

Most lumberyards and home centers offer a limited range of decking material. You'll have to do some investigative work yourself if you want to examine all the options. But to get started, here's a rundown of some of your choices.

» Pressure-treated Pine and Fir

Pressure-treated wood is great for framing a deck, but not for decking it. Even the clearest, straightest boards can crack, warp and split with exposure to the elements. A protective finish, applied at least once a year, will slow down but not prevent this weathering process. Bottom line: your least expensive, most unstable choice.

» Redwood and Cedar

Both woods are naturally resistant to decay and far more stable than pressure-treated lumber; they're much less prone to warping and splitting. Bottom line: Top-notch natural decking material. Place your order well ahead of time because these woods are not always available.

» Exotic Wood

A number of small companies import tropical hardwoods to be sold as premium decking material. Heavier and much harder than cedar and redwood, these exotics require that you predrill pilot holes for screws. Bottom line: The most expensive wood deck you can buy, but you'll probably never have to replace it.

» Synthetic Decking

There are two types: composite lumber, made by combining wood fiber or sawdust with plastic, and all-plastic products. It's worth calling or e-mailing for product information because most manufacturers are expanding their product lines to include railings, balusters and other elements. Bottom line: If you don't need a traditional wood deck, this is the way to go. Relatively low maintenance, and composite lumber is an environment-friendly choice: it's made from wood waste and recycled plastic.

» Detail the Framing

Now it's time to work out the framing details. In your final plan and elevation views, show the spacing of posts, beams and joists, and note their sizes. If you're new to deck construction, take your design drawings to a lumberyard or to a professional builder, and let the pros work out the structural details. A lumber dealer shouldn't charge you for this service, but a contractor probably will. Even if you're comfortable working out the framing details yourself, it's smart to have your local building inspector go over them. The project will likely require a building permit, and this way you'll be sure your deck's structure meets your town's minimum code requirements.

» Get Ready to Build

A successful, smooth construction project depends to some extent on having the materials—all the materials—and the tools you'll need, in hand at the right time. It's a good idea to make a checklist of the things you'll need to order, and to plan ahead where you'll store various items until you're ready to use them. Here are some of the categories and items you may want to put on that list.

» Decking and Framing Materials

Remember to order the railing posts, rails and balusters, too.

Fasteners and hardware. Talk with the folks at your lumberyard about which of these you'll need: rafter and stair gauge; decking nails, screws, machine bolts, carriage bolts and lag bolts; post anchors, post beam caps, hold-downs, deck clips and joist hangers; flashing.

Electrical supplies for outdoor wiring work. Conduit, wire, outlet boxes, receptacles, switches and light fixtures.


Tools

  • Circular saw
  • Decking saw blades
  • 50-foot outdoor extension cord
  • Cordless drill
  • Drill bits
  • 50-foot metal tape measure
  • Carpenter's square
  • Plumb bob
  • 4-foot level
  • Framing hammer
  • Chalk line
  • Line level
  • Wrench set
  • Post-hole digger
Tim Snyder, writer, photographer and carpenter, was a senior editor at Fine Homebuilding magazine and executive editor of American Woodworker magazine. With TV personality Norm Abram, Snyder coauthored two books in the best-selling New Yankee Workshop series. He's also written books on deck design and furniture making.
   Back  |  Arizona Specialty Woodcrafts  |  Privacy  |  Resources  |  Site Map  |  About Us  |  Contact Us  |  Bookmark Us
Copyright © azWoodman.com ~ All rights reserved