
| Tools Needed: | Materials Needed: |
|
▸ Stud finder ▸ Hand saw ▸ Hammer ▸ Tape measure ▸ Framing square ▸ Circular saw ▸ Screwdriver |
▸ Finish nails (6d and 8d) ▸ 1x3 lumber ▸ 4x8 sheet of 3/4" plywood ▸ 6-foot clothes pole ▸ Clothes-pole brackets ▸ Paint or wood stain |
⦿ Step 1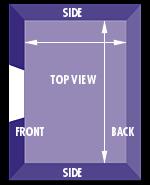 Measure the back and side walls to determine the length of the shelf supports. Be sure to deduct 1 1/2 inches from the length of the back-wall shelf-support measurement (the 3/4-inch thickness of each end support). Measure the back and side walls to determine the length of the shelf supports. Be sure to deduct 1 1/2 inches from the length of the back-wall shelf-support measurement (the 3/4-inch thickness of each end support). |
⦿ Step 2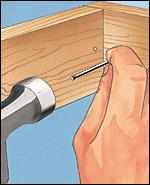 Cut 1x3 shelf supports to fit the back and side walls of the closet. Attach the supports for the top shelf to the walls with their top edges 84 inches above the floor using 8d finish nails driven into the wall studs. Cut 1x3 shelf supports to fit the back and side walls of the closet. Attach the supports for the top shelf to the walls with their top edges 84 inches above the floor using 8d finish nails driven into the wall studs. |
⦿ Step 3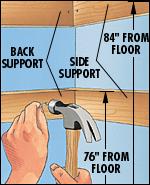 Cut the supports for the bottom shelf, and attach them to the wall with their top edges 76 inches above the floor, again using 8d finish nails driven directly into the wall studs. Cut the supports for the bottom shelf, and attach them to the wall with their top edges 76 inches above the floor, again using 8d finish nails driven directly into the wall studs. |
⦿ Step 4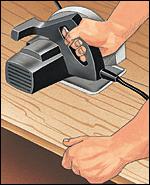 Cut the two long 11 7/8-inch-wide shelves from 3/4-inch plywood. Then cut them to length to fit the width of your closet. Cut the two long 11 7/8-inch-wide shelves from 3/4-inch plywood. Then cut them to length to fit the width of your closet. |
⦿ Step 5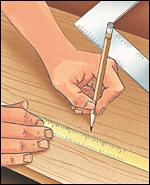 Measure and cut the two 11 7/8x76-inch side pieces for the central shelf unit from 3/4-inch plywood. Measure and cut the two 11 7/8x76-inch side pieces for the central shelf unit from 3/4-inch plywood. |
⦿ Step 6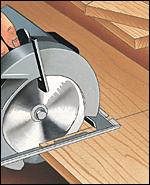 Measure and cut the six 11 7/8-inch-square shelves for the central unit from 3/4-inch plywood. Measure and cut the six 11 7/8-inch-square shelves for the central unit from 3/4-inch plywood. |
⦿ Step 7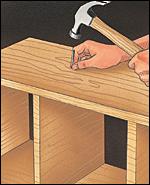 Assemble the central shelf unit using 6d finish nails. Space the shelves evenly or according to the height of the items you plan to store. Leave the top and bottom of the unit open. Assemble the central shelf unit using 6d finish nails. Space the shelves evenly or according to the height of the items you plan to store. Leave the top and bottom of the unit open. |
Step 8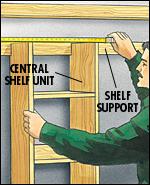 Position the central shelf unit in the middle of the closet. Position the central shelf unit in the middle of the closet. |
⦿ Step 9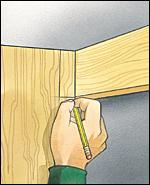 Mark notches on the sides of the central shelf unit to fit around the lower
shelf's back support, and cut them out with a hand saw. Mark notches on the sides of the central shelf unit to fit around the lower
shelf's back support, and cut them out with a hand saw. |
⦿ Step 10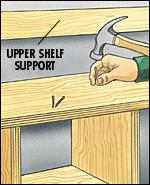 Lay one of the long shelves on the lower shelf supports and on top of the central shelf unit. Attach the shelf with 6d finish nails. Lay one of the long shelves on the lower shelf supports and on top of the central shelf unit. Attach the shelf with 6d finish nails. |


📌 We are a participant in the Amazon.com Services LLC Associates Program, an affiliate advertising program designed to provide a means for sites to earn advertising fees by advertising and linking to Amazon.com.